How to Make a Bookmark With Cricut: A Stepwise Guide
Hey, Cricut enthusiasts! Are you in search of a tutorial on how to make a bookmark with Cricut? Be patient, as I have covered everything in this write-up. I always need a bookmark to keep track of my reading progress in books. Without it, I can’t continue reading books. Since I forget things a lot and can’t remember which page I read last time, it becomes essential for me to keep a separate bookmark for each book😅.
But don’t you think it costs so much to buy a new and small
bookmark from the store🤑? Damn, its price is really high! I couldn’t
afford that much, so I thought I’d create one myself. Yes, being a crafter, if
we can’t make a bookmark using Cricut, then what’s the point of crafting? If
you want to create a glitter bookmark with me, hop on a board with me!
Step
1: Start a New Project on the Cricut App
Before we delve into how
to make a bookmark with Cricut, you need to ensure that Cricut Design Space
is installed on your compatible computer device. After that, follow the steps
in the section below:
- You have to open up your
Design Space app and start a New
Project.
- Go to the left toolbar
menu and select Images.
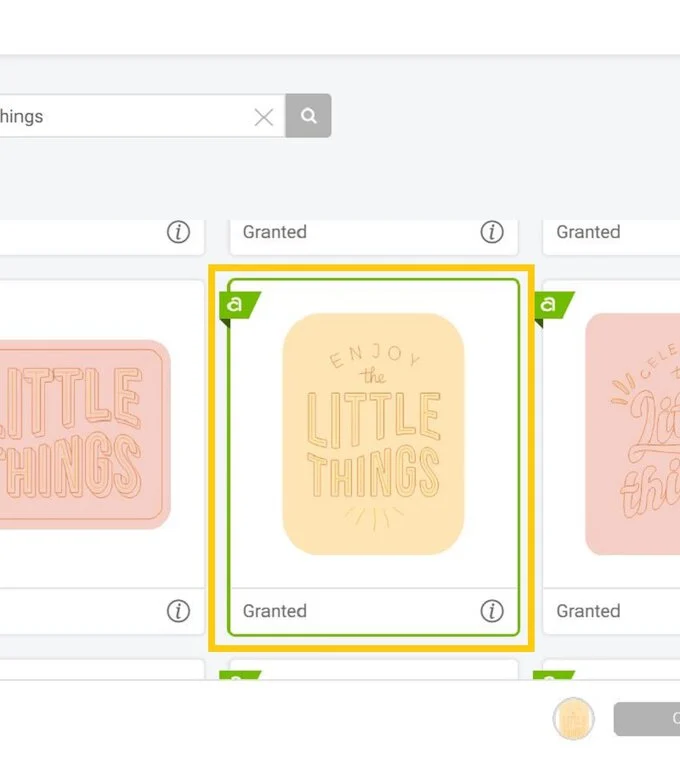
- Then, open the Art Type menu and choose Draw Only.
- Afterward, you will
need to type “Enjoy the Little
Things” on the search bar and press Enter on the keyboard.
- After that, you have to
select the design that you are looking for and click on the Insert option.
Step
2: Edit the Bookmark Image
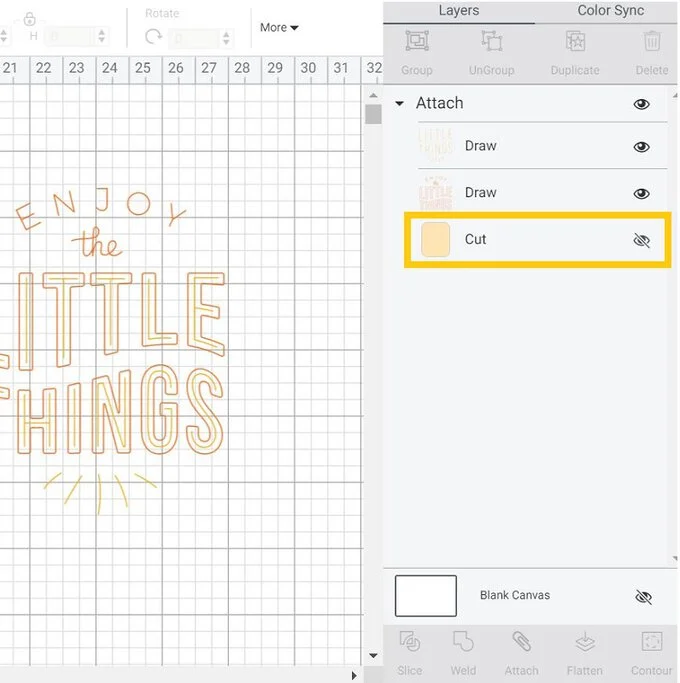
Once an image is added to the canvas, you need to select
your image and hide the below-highlighted layer by just clicking on the eye
symbol.
Then, click on the second image layer and hit the Contour button given at the bottom of
your layer panel. Click the three vertical curved lines given at the bottom to
hide them.
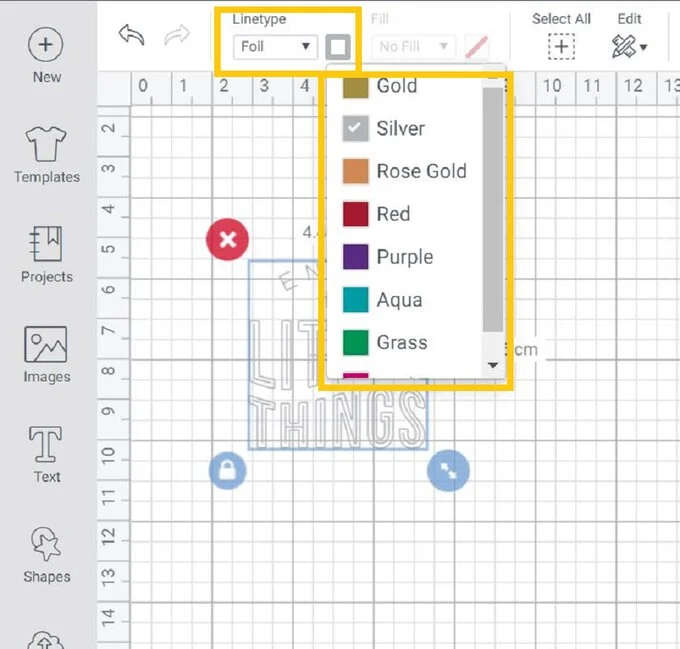
Now, I am going to change the Linetype by selecting Foil from
the dropdown menu. Also, you need to select the Fine line weight.
After that, you will need to choose the color as per your
choice. After you are satisfied with your image design, you need to move
further to learn how to make a bookmark
with Cricut cutting machine.
Step
3: Adjust the Shape and Size
Now, we need to adjust the width of a rectangular bookmark
as per the required size. For this, go to the Shapes menu, and you will need to insert a square. Hit the Padlock icon so that you can adjust the
width and height of the shape.
Amend the width properly so that it matches the shape of the
bookmark.
Step
4: Arrange Your Shape
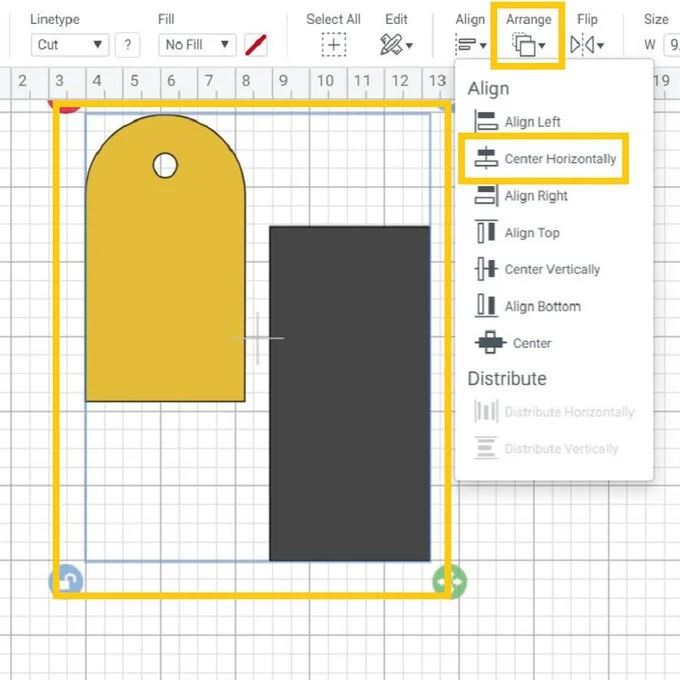
Now, we need to drag the selection box over both shapes and
click the option Arrange button. To
arrange, you have to click on Centre
Horizontally from the given dropdown menu.
It should look something like this.
After that, you have to click the grey rectangle and press
the arrow facing downwards on your keyboard. Keep pressing it until the shape
is in its desired location.
Once you are satisfied with the placement, you should drag
the selection box over both shapes and select Weld to join both shapes together. Then, you need to weld the
design to join both shapes together. Furthermore, you have to add color to the
shapes.
You have to go to the Shapes
and then click the Score Line. After that, you have to
change the line type to Foil and
select the same line.
Step
5: Start Cutting Your Material
On the next screen, you will move to the Mat Preview screen. Then, hit the Continue button and proceed.
Place the faux leather on your cutting mat and then use a
brayer to adhere it to the mat properly. Install the foiling tip into the
housing. Move the white stars on the right side. Perform the instructions to
cut the design. Before you unload the mat, you need to remove the foiling
sheet.
After that, install the Fine-Point blade and cute bookmark
shapes. Finally, you have learned how to
make a bookmark with Cricut. Follow the instructions carefully to create
your own.
FAQs
Question
1: What do I need to make a bookmark on Cricut?
Answer: Basic supplies are required for making bookmarks with Cricut. Besides, you must install your Design Space on a computer or mobile device. Here are the supplies needed for your bookmark:
● Cricut
Machine (Maker or Explore or Joy)
● Brayer
● Faux
Leather
● Foil
sheet
● Tape
● Cricut
StrongGrip Mat (Purple)
● Fine-Point
Blade
Question
2: What materials can I use to make my bookmark on Cricut?
Answer: In my experience, you have various materials that you can try for making beautiful personalized bookmarks. For example, you can use
●
Cardstock: It can be easily cut, engraved, embossed, or
curled.
●
Faux Leather: Available in multiple patterns and easy
to cut on Cricut.
●
Resin: Make decals and use resin to top them to seal
them.
Question
3: Can I make bookmarks on Cricut Joy?
Answer: Yes, of course! In fact, the Cricut machine is the
most suitable device for making small projects such as cards, bookmarks, and so
much more. So, there is no doubt about it. The Cricut Joy is compatible with 50
materials, meaning it can cut up to 50 materials hassle-free. Moreover, you can
use specialty papers to create an extraordinary bookmark.
Final
Words
In this tutorial, I have explained how to make a bookmark with Cricut. From step-by-step instructions,
I have tried to make it easier for everyone, including beginners. Making bookmarks with Cricut will
require you to use some materials or supplies that I have already mentioned in
this blog. Make sure you get all of them to make everything smooth. Start your
journey to make a bookmark with me and keep tracking your reading progress.
Read more: install cricut design space app







Comments
Post a Comment